12/24/13
Happy New Years Eve! Since you're probably getting your drinks, appetizers, party favors, and sparkling new years outfits all ready for tonight, I'll help you out with your hangover tomorrow morning...aka Breakfast Wraps. These include just about everything you could ever need to cure your headache and empty stomach: Eggs, potatoes, sausage, onions, avocado...etc. Add this recipe onto your grocery list when you head out to the store today and you will thank me tomorrow! I have tried different wraps at some local breakfast spots in Chicago and these homemade ones are by far the best i've had. So cheers to 2013 with some fancy mimosas and these delicious wraps!
Breakfast Wraps
Ingredients:
1 Package Tortilla Wraps
1 Package Turkey Sausage
2 Avocados
1/4 Cup Milk
4 Eggs
1 Tomato
3 Small Red Potatoes
1 Small Onion
1/2 Tsp Red Pepper Flakes
Salt & Pepper
Directions:
1. Cut up Avocados, Tomatoes, Potatoes and Onions into small pieces.
2. Cook turkey sausage on medium heat in a saute pan until browned. In a different pan, saute onions and potatoes until golden brown.
3. In a separate pan, add eggs, milk, red pepper flakes, salt, pepper and scramble over medium-low heat.
4. Spread out tortilla wraps and arrange the toppings to your liking towards either the left or right side. Carefully start wrapping the tortilla by folding in the sides and tightly rolling the wrap. Cut down the middle and enjoy!
*If you like cheese, feel free to add that in as well! I love my breakfast wraps with a LOT of hot sauce =)
Tuesday, December 31, 2013
Monday, December 30, 2013
Fabulous Fillets
12/23/13
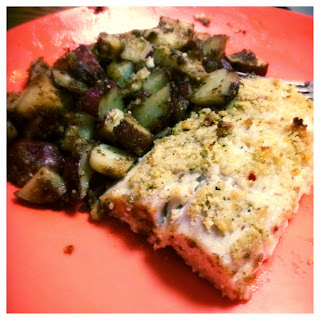
Now that Christmas is over, I'm sure almost everyone is sick of turkey, beef, ham, or basically any heavier food on their dining tables. I know I am! Justin and I made this Parmesan Encrusted Mahi Mahi dish that is probably one of the easiest and quickest meals I have made in a long time. It looks and tastes like it's restaurant quality but won't wreck your wallet. Even though it is only 15 degrees here in Chicago, you can still feel like you're on the islands eating this Mahi Mahi recipe =). Surf's up!
Parmesan Encrusted Mahi Mahi
Ingredients:
2 Frozen Mahi Mahi Fillets
1/4 Cup Parmesan Cheese
1/2 Cup Panko Bread Crumbs
2 Tbsp Butter
1/4 Tsp Red Pepper Flakes
1/4 Tsp Oregano
Salt & Pepper To Taste
*If you choose to add the side of potatoes, I used 3 small/medium red potatoes and 1 packet of McCormick Onion and Garlic seasoning mix.
Directions:
1. Thaw Mahi Mahi Fillets.
2. Preheat the oven to 350 degrees F.
3. In a bowl, mix the parmesan, bread crumbs, and spices together.
4. Melt the butter in a separate bowl and add it to the crumb mixture.
5. Heavily coat the Mahi Mahi fillets in the crumb mixture until they are fully covered on both sides.
6. Coat a baking dish with cooking spray and place the fillets into the dish, covering the tops with any extra bread coating.
7. If you are cooking the potato side dish, spread the potatoes around the baking pan evenly. They cook at about the same time degree as the fish, so you can save dishes!
8. Bake the fish for about 12-15 minutes until the fillets are white and flakey. Flip the potatoes halfway through and cook until golden brown.
Happy Holidays and Happy Eating!
Now that Christmas is over, I'm sure almost everyone is sick of turkey, beef, ham, or basically any heavier food on their dining tables. I know I am! Justin and I made this Parmesan Encrusted Mahi Mahi dish that is probably one of the easiest and quickest meals I have made in a long time. It looks and tastes like it's restaurant quality but won't wreck your wallet. Even though it is only 15 degrees here in Chicago, you can still feel like you're on the islands eating this Mahi Mahi recipe =). Surf's up!
Parmesan Encrusted Mahi Mahi
2 Frozen Mahi Mahi Fillets
1/4 Cup Parmesan Cheese
1/2 Cup Panko Bread Crumbs
2 Tbsp Butter
1/4 Tsp Red Pepper Flakes
1/4 Tsp Oregano
Salt & Pepper To Taste
*If you choose to add the side of potatoes, I used 3 small/medium red potatoes and 1 packet of McCormick Onion and Garlic seasoning mix.
Directions:
1. Thaw Mahi Mahi Fillets.
2. Preheat the oven to 350 degrees F.
3. In a bowl, mix the parmesan, bread crumbs, and spices together.
4. Melt the butter in a separate bowl and add it to the crumb mixture.
5. Heavily coat the Mahi Mahi fillets in the crumb mixture until they are fully covered on both sides.
6. Coat a baking dish with cooking spray and place the fillets into the dish, covering the tops with any extra bread coating.
7. If you are cooking the potato side dish, spread the potatoes around the baking pan evenly. They cook at about the same time degree as the fish, so you can save dishes!
8. Bake the fish for about 12-15 minutes until the fillets are white and flakey. Flip the potatoes halfway through and cook until golden brown.
Happy Holidays and Happy Eating!
Thursday, December 19, 2013
東方雞肉沙拉
12/19/13
One of my favorite quick spots to eat around my apartment is a pita/salad place called Pockets. I always get the Asian Salad with Chicken. Although I love it, I do not enjoy the price I pay (over $10). So, I decided to make my own version at home and added some ingredients that even Pockets leaves out. This salad recipe is easy and healthy but still has a restaurant-type feel. So grab your chopsticks because it's time to get Oriental!
Oriental Chicken Salad
Ingredients:
1 Head Romaine Lettuce
2 Chicken Breasts
1 Bag of Broccoli, Sugar Snap Peas, and Carrots
1 Small Can of Water Chestnuts
1 Can Mandarin Oranges
1 Bag Chow Mein Noodles
1 Bottle Sesame Ginger Sauce (I used La Choy)
Directions:
1. Chop up uncooked chicken into small pieces and cook them on a sauté pan over medium heat until done.
2. Chop up the lettuce finely so it resembles a chopped salad.
3. Drain the juice from the water chestnuts and mandarin oranges. Toss all of the ingredients into once big bowl, saving the chow mien noodles to sprinkle on top.
4. Drizzle the sesame ginger sauce on top and shake up the salad.
I was able to make 4 salad servings from this recipe for around $4 each. It definitely saved me some money and I was able to enjoy it for lunch too =).
Wednesday, December 4, 2013
Let it Snow! Let it Snow! In a Globe!
Happy Holidays!
Now that Christmas will be creeping up faster than you think, it's time to stop staring at all of your DIY boards on Pinterest and start putting your crafting skills to use! Many of the crafts on Pinterest seem overwhelming, but here is one I found that turned out even better than I had expected. The original craft I found just used wine glasses and a few trees with snow. I took it a few steps further and added different Christmas themed pieces under my wine glasses and added some bells and ribbon. The best thing about this project is that you can create snow globes using your own style and personality. They also make the best gifts!
Snow Globe Wine Glasses
Materials:
4 Wine Glasses
4 Sheets of Green Felt
1 Glue Gun (and sticks)
Scissors
1 Roll Thin Ribbon
Variety of Items To Place Underneath Glass
Artificial Snow
Cardboard
4 Small Bells
Directions:
1. Heat up your glue gun.
2. Flip a wine glass upside down and use it to measure a circle on the cardboard. Cut the cardboard piece out (This will be used as the base).
3. Measure and cut two felt pieces the same way, however, draw the circles 1cm larger in circumference around the outsides.
4. Take one felt piece and place it over the piece of cardboard. Using the glue gun, glue the extra edges onto the back side of the cardboard. Glue the second piece of felt onto the other side. Don't worry, if one side looks worse than the other, use that side as the top because it will be covered with snow =).
5. Take whatever item you want to present under your globe and glue it to the base.
6. Pour about 1/4 cup or less of snow into your wine glass. Once you have done this, line the rim of your wine glass with glue.
7. Carefully take your base piece and turn it upside down into the wine glass to attach the entire globe together.
8. Once dry, measure and cut a piece of ribbon. Follow by adhering the ribbon around the outside of the base.
9. Lastly, attach bells, ribbon, or anything else you can think of to add some holiday cheer to your snow globe. (There are never too many sparkles =)).
Now it's time to gift it to that special someone in your life. Have fun with this and I hope you are enjoying the holidays! xo
Subscribe to:
Posts
(
Atom
)