Tuesday, December 31, 2013

Break in 2014 with Breakfast Wraps

12/24/13

Happy New Years Eve! Since you're probably getting your drinks, appetizers, party favors, and sparkling new years outfits all ready for tonight, I'll help you out with your hangover tomorrow morning...aka Breakfast Wraps. These include just about everything you could ever need to cure your headache and empty stomach: Eggs, potatoes, sausage, onions, avocado...etc. Add this recipe onto your grocery list when you head out to the store today and you will thank me tomorrow! I have tried different wraps at some local breakfast spots in Chicago and these homemade ones are by far the best i've had. So cheers to 2013 with some fancy mimosas and these delicious wraps!


Breakfast Wraps


Ingredients:
1 Package Tortilla Wraps
1 Package Turkey Sausage
2 Avocados
1/4 Cup Milk
4 Eggs
1 Tomato
3 Small Red Potatoes
1 Small Onion
1/2 Tsp Red Pepper Flakes
Salt & Pepper

Directions:
1. Cut up Avocados, Tomatoes, Potatoes and Onions into small pieces.
2. Cook turkey sausage on medium heat in a saute pan until browned. In a different pan, saute onions and potatoes until golden brown.
3. In a separate pan, add eggs, milk, red pepper flakes, salt, pepper and scramble over medium-low heat.
4. Spread out tortilla wraps and arrange the toppings to your liking towards either the left or right side. Carefully start wrapping the tortilla by folding in the sides and tightly rolling the wrap. Cut down the middle and enjoy!

*If you like cheese, feel free to add that in as well! I love my breakfast wraps with a LOT of hot sauce =)


Monday, December 30, 2013

Fabulous Fillets

12/23/13

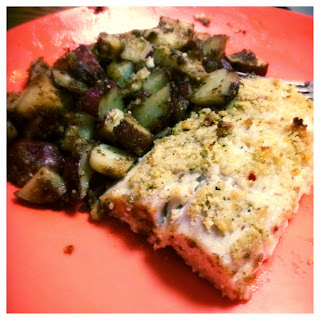
Now that Christmas is over, I'm sure almost everyone is sick of turkey, beef, ham, or basically any heavier food on their dining tables. I know I am! Justin and I made this Parmesan Encrusted Mahi Mahi dish that is probably one of the easiest and quickest meals I have made in a long time. It looks and tastes like it's restaurant quality but won't wreck your wallet. Even though it is only 15 degrees here in Chicago, you can still feel like you're on the islands eating this Mahi Mahi recipe =). Surf's up!

Parmesan Encrusted Mahi Mahi

Ingredients:

2 Frozen Mahi Mahi Fillets
1/4 Cup Parmesan Cheese
1/2 Cup Panko Bread Crumbs
2 Tbsp Butter
1/4 Tsp Red Pepper Flakes
1/4 Tsp Oregano
Salt & Pepper To Taste

*If you choose to add the side of potatoes, I used 3 small/medium red potatoes and 1 packet of McCormick Onion and Garlic seasoning mix.

Directions:
1. Thaw Mahi Mahi Fillets.
2. Preheat the oven to 350 degrees F.
3. In a bowl, mix the parmesan, bread crumbs, and spices together.
4. Melt the butter in a separate bowl and add it to the crumb mixture.
5. Heavily coat the Mahi Mahi fillets in the crumb mixture until they are fully covered on both sides.
6. Coat a baking dish with cooking spray and place the fillets into the dish, covering the tops with any extra bread coating.
7. If you are cooking the potato side dish, spread the potatoes around the baking pan evenly. They cook at about the same time degree as the fish, so you can save dishes!
8. Bake the fish for about 12-15 minutes until the fillets are white and flakey. Flip the potatoes halfway through and cook until golden brown.

Happy Holidays and Happy Eating!


Thursday, December 19, 2013

東方雞肉沙拉

12/19/13

One of my favorite quick spots to eat around my apartment is a pita/salad place called Pockets. I always get the Asian Salad with Chicken. Although I love it, I do not enjoy the price I pay (over $10). So, I decided to make my own version at home and added some ingredients that even Pockets leaves out. This salad recipe is easy and healthy but still has a restaurant-type feel. So grab your chopsticks because it's time to get Oriental!

Oriental Chicken Salad

Ingredients:
1 Head Romaine Lettuce
2 Chicken Breasts
1 Bag of Broccoli, Sugar Snap Peas, and Carrots
1 Small Can of Water Chestnuts
1 Can Mandarin Oranges
1 Bag Chow Mein Noodles
1 Bottle Sesame Ginger Sauce (I used La Choy)

Directions:
1. Chop up uncooked chicken into small pieces and cook them on a sauté pan over medium heat until done.
2. Chop up the lettuce finely so it resembles a chopped salad.
3. Drain the juice from the water chestnuts and mandarin oranges. Toss all of the ingredients into once big bowl, saving the chow mien noodles to sprinkle on top.
4. Drizzle the sesame ginger sauce on top and shake up the salad.

I was able to make 4 salad servings from this recipe for around $4 each. It definitely saved me some money and I was able to enjoy it for lunch too =).


Wednesday, December 4, 2013

Let it Snow! Let it Snow! In a Globe!

Happy Holidays!

Now that Christmas will be creeping up faster than you think, it's time to stop staring at all of your DIY boards on Pinterest and start putting your crafting skills to use! Many of the crafts on Pinterest seem overwhelming, but here is one I found that turned out even better than I had expected. The original craft I found just used wine glasses and a few trees with snow. I took it a few steps further and added different Christmas themed pieces under my wine glasses and added some bells and ribbon. The best thing about this project is that you can create snow globes using your own style and personality. They also make the best gifts!

Snow Globe Wine Glasses

Materials:
4 Wine Glasses
4 Sheets of Green Felt
1 Glue Gun (and sticks)
Scissors
1 Roll Thin Ribbon
Variety of Items To Place Underneath Glass
Artificial Snow
Cardboard
4 Small Bells

Directions:
1. Heat up your glue gun.
2. Flip a wine glass upside down and use it to measure a circle on the cardboard. Cut the cardboard piece out (This will be used as the base).
3. Measure and cut two felt pieces the same way, however, draw the circles 1cm larger in circumference around the outsides.
4. Take one felt piece and place it over the piece of cardboard. Using the glue gun, glue the extra edges onto the back side of the cardboard. Glue the second piece of felt onto the other side. Don't worry, if one side looks worse than the other, use that side as the top because it will be covered with snow =).
5. Take whatever item you want to present under your globe and glue it to the base.
6. Pour about 1/4 cup or less of snow into your wine glass. Once you have done this, line the rim of your wine glass with glue.
7. Carefully take your base piece and turn it upside down into the wine glass to attach the entire globe together.
8. Once dry, measure and cut a piece of ribbon. Follow by adhering the ribbon around the outside of the base.
9. Lastly, attach bells, ribbon, or anything else you can think of to add some holiday cheer to your snow globe. (There are never too many sparkles =)).


Now it's time to gift it to that special someone in your life. Have fun with this and I hope you are enjoying the holidays! xo

Monday, November 25, 2013

A Mini Friendsgiving

11/25/13

Months and months ago, Justin and Reid surprised me and Sarah by making us a full Italian meal consisting of chicken parmesan, spaghetti, salad, and garlic bread. It was so tasty and we were pretty impressed. Sarah and I were long overdue on creating our own meal for the guys, so we decided to have a relaxing night with cooking, drinking, and games. Since we have already started dreaming about upcoming Thanksgiving food, we decided to get a little head start by making mashed potato stuffed chicken with asparagus. This recipe doesn't require many ingredients, but it sure is delicious! Check it out…

Mashed Potato Stuffed Chicken

Ingredients:
3 Baking Potatoes (Peeled and cut into chunks)
1/4 Cup Skim Milk
4 Tbsp Butter
2 Tbsp Lemon Juice
Salt and Pepper
4 Bone-in Chicken Breast Halves
2 Tbsp Olive Oil
2 Tbsp Chopped Parsley
1 Bunch Asparagus

Chicken Directions:
1. Preheat the oven to 400F. Place potatoes in a saucepan and fill up with cold water just enough to cover. 
2. Bring the water to a boil. Lower the heat and simmer until the potatoes are tender, about 20-25 minutes. 
3. Drain the pan and return potatoes to the pan. Add the milk, butter, parsley and lemon juice and mash until smooth. Season the potatoes with salt and pepper.
4. Using your fingers, find an opening in the middle of the chicken breasts and fill the center with the mashed potatoes. It is okay if some of the potatoes leak out of the chicken and are exposed.
5. Place the chicken in a baking pan and drizzle them with olive oil. Finish by sprinkling the chicken with salt and pepper.
6. Bake in the oven for about an hour, until tender and juices run clear.

Asparagus Directions:
1. Break off the end of the asparagus and arrange them onto a baking pan.
2. Drizzle with olive oil, salt, and pepper. Finish by sprinkling lemon juice on top.
3. Bake in the oven at 400F for 10-15 minutes, flipping the asparagus halfway through. They should be golden-brown and slightly crispy.


Wednesday, November 20, 2013

Give Thanks with Pumpkin Doughnut Muffins

11/20/13

A new restaurant has opened up next to my train stop that bakes delicious doughnuts every morning. As I wait for my train, the smell travels through the waiting platform and triggers a donut craving every time. This gave me the inspiration to try my own hand at homemade doughnuts. Since I try to stay on the healthy side, I tried to find a recipe for baked doughnuts rather than fried ones. I came across a baked pumpkin doughnut recipe and decided it was a perfect recipe to try around the holidays. The recipe called for a doughnut pan, but since I don't own one, I decided to make doughnut holes and doughnut "muffins". These muffins are awesome because they have the look of a muffin, but the texture of a doughnut with a more moist and spongy consistency. While everyone prepares for their Thanksgiving dinner, you can dazzle their tastebuds with this Thanksgiving breakfast!

Pumpkin Doughnut Muffins

Ingredients:
1/2 Cup Vegetable Oil
3 Large Eggs
1 Can Libby's Pumpkin Puree
1 1/2 Cups Granulated Sugar
2 Tsp Pumpkin Pie Spice
1 1/2 Tsp Salt
1 1/2 Tsp Baking Powder
1 3/4 + 2 Tbsp All Purpose Flour
1/3 Cup Cinnamon & Sugar
2 Tbsp Butter, Softened

Directions:
1. Preheat the oven to 350F.
2. Beat together the oil, eggs, pumpkin, sugar, salt, spices, and baking powder until smooth.
3. Add the flour and stir until smooth.
4. In a separate bowl, combine butter with the cinnamon and sugar mixture to create a crumble topping.
5. Lightly grease muffin pans/and or a baking sheet (if you decide to bake doughnut holes).
6. Fill muffin pans 3/4 full with batter and generously top with cinnamon crumble.
7. If baking the doughnut holes, use a spoon to create walnut-sized balls of batter onto baking sheet.
8. Bake muffins for 20-25 minutes until golden brown. Bake doughnut holes for 10-15 minutes.
9. Roll doughnut holes in a cinnamon and sugar mixture.
10. Enjoy and give thanks!


Tuesday, November 19, 2013

Wasting Away Again In Naples

11/18/13

Eat, drink, relax, drink, drink, eat, relax. That pretty much sums up my Florida trip last week, so it will be no surprise that this post will consist of fun vacation-ey drinks! One of my favorite things to do is unwind at either a bar or restaurant with live music and sip on a martini =). My favorite martini is probably a French Kiss, but i love to try out different kinds as well. Our favorite spot in naples is a club/bar called the Blue Martini. Every night from 4-8 they have half priced martinis and small plates so we definitely took advantage of this deal and tried out some fun 'tinis! They also have great live bands in the evening, so if you are in Naples you definitely need to try this place out! We did...3 times =) Take a peek:

Top left: Palm Beacher, Top right: Almond Joy, Bottom left: Sex in the City, Bottom right, Mojito, Far right: Creamsicle Crush

They have the BEST lemon chicken skewers drizzled with pesto sauce... I'm slightly obsessed.

Although I love having fancy drinks made for me, it was also fun trying to make our own fancy drinks back at the condo. While out shopping, Justin and I came across a pomegranate martini mix that was just $2.30. We were able to make fun, low-cost martinis...rimmed with sugar of course.

Pomegranate Martini
Ingredients:
1.5 Oz. Vodka
3 Oz. Pomegranate Martini Mix
1 Oz. Sprite
1/4 Cup White Sugar

Directions:
Combine ingredients in a shaker heavily filled with ice. Wet the rim of your martini glass and roll it in sugar. Fill the glass with the contents in your shaker and garnish with a lemon slice. (I could have sworn we took a picture of one, but I guess not... so until next time you'll have to visualize it for yourself!)

After spending a night at the restaurant, Handsome Harry's, in downtown Naples, I also felt the need to create my own drink at the condo. While at Handsome Harry's, I saw an Orange Crush on the menu and had to order it because it is a staple drink in Ocean City, Maryland. While bartending in MD, I used to cut fresh oranges for each and every Orange Crush and they were so refreshing and delicious. At the restaurant, I noticed they used bottled orange juice instead. I decided that Justin needed to try an authentic one, so I made a few at the condo. They are very simple to make and do not require many ingredients, but they definitely make you feel like you are on vacation!

Here we are enjoying some music and drinks at Handsome Harry's.

Orange Crush (Ocean City Style)
Ingredients:
1.5 Oz. Vodka
1 Oz. Triple Sec
1 Orange, Squeezed
Splash of Sprite

Directions:
Combine above ingredients into a shaker with crushed ice and add more/less of each ingredient depending on your liking. Garnish with an orange slice.

Okay, by this point you are probably thinking... these people are alcoholics. But we are just on vacation, I promise! And this next one... you can blame my wine-obsessed parents =). While visiting Epcot, it happened to be the last day of their annual Food and Wine Expo. In lieu of the event, we decided to try a wine tasting:
We enjoyed a Riesling, Pinot Gris, and a Pinot Noir from King's Vineyard in Oregon.


After a day full of fun rides and visiting the countries around the world, we ended with a delicious dinner at the San Angel Inn located in Mexico. The scenery is romantic with bright, colorful lights in a dimly set room. While we waited for our table, we were able to take a boat ride to visit the three caballeros. Olay! =)

I'm usually skeptical about eating at parks, but this restaurant had an upscale feel and the food was awesome! I definitely recommend this place with dining out at Epcot.

This post is really making me wish I was back in Florida. Now back to sipping on my coffee...




Thursday, November 7, 2013

Minty Fresh

11/17/13

In preparation of leaving for Florida soon, people would normally place themselves on a strict diet and exercise regime. What have Justin and I been doing?... Making ice cream of course! After running across a collection of amazing ice cream recipes, I decided to buy a small ice cream maker. This purchase was one of the best ideas I have had in a while. It's fun to use a basic recipe to make all kinds of different flavors and combinations. It's fairly easy and you pretty much can't go wrong with whatever you decide to experiment with! One of my favorite ice cream flavors is mint chocolate chip and when Justin grabbed a bag of Andes mints at the store, we immediately knew those would be tossed in our ice cream that night! Most homemade ice cream is made with whole milk, but this recipe is much lighter and easier on the stomach because it is made with skim milk. If you own an ice cream maker, I dare you to give it a try!

Andes Mint Chocolate Ice Cream

Ingredients:
2 Cups Milk (I used skim)
2 Eggs
1 Cup Sugar
1/2 Tsp Salt
1 Cup Half & Half
1 Tsp Vanilla Extract
1 Tsp Mint Extract
3/4-1 Cup Crushed Andes Mints

Directions:
1. Unwrap the mints and crush them in a bag to desired consistency.
2. In a saucepan, whisk half & half, eggs yolks, sugar, and salt. Cook and stir over low heat until the mixture is fairly thick and will coat the back of a metal spoon.
3. Remove mixture from heat and let it cool for a few minutes.
4. Stir in the milk, vanilla, and peppermint extract.
5. Chill mixture in the refrigerator until it is completely cooled.
6. Once cooled, pour the mixture into your already frozen ice cream maker.
7. Just before the freezing cycle is completed, stir in the crushed mints. (This allows the mixture to combine evenly and prevents the chocolate from falling to the bottom.)
8. Once the ice cream is completely frozen, it's time to scoop and refresh your mouth with a minty fresh dessert!


(We did not do this, but if you want your ice cream to look "minty" feel free to add a drop or two of green food coloring to the mix!)


Wednesday, October 30, 2013

Trick Or Treat! Here Are Some Friendly Ghosts To Eat...

10/30/13

Since Halloween is tomorrow, I thought I would share a cute halloween treat I found on my favorite site, Pinterest. I love chocolate covered pretzels... but I love them even more when they are festive! This recipe is simple and quick, yet fun to make and share! You can get even more creative and dye your white chocolate chips with green or orange food coloring to make frankenstein pretzels or pumpkin pretzels. I just stuck to these cute little ghosts. They make great gifts to either give out to friends, family, or trick or treaters. Happy Halloween!

Spooky Chocolate Covered Pretzels

Ingredients:
1 Bag Pretzel Rods
1 Bag White Chocolate Chips
1/2 Tbsp Vegetable Oil
1 Cup Black and Orange Sprinkles (These may be hard to find, but if you make friends with the bakery ladies like I did they may sneak you some free ones! =))
1 Tube Black Icing
2-3 Sheets Aluminum Foil

Directions:
1. Lay out the sheets of aluminum foil on flat counter space.
2. Pour the chocolate chips and vegetable oil into a microwaveable-safe bowl and heat for 90 seconds. Stir the bowl and heat for another 15 seconds until the chocolate is completely melted.
3. Pour the chocolate on plate so that it is easy to roll the pretzels in.
4. Roll the top half of the pretzel rods in chocolate and place on the foil to cool.
5. Cover half of the pretzel rods in sprinkles and allow those to cool as well.
6. Once the pretzels are fully cooled, use the black icing to draw goulish faces onto your ghosts. Leave them set until the icing is dry.
7. If you desire, package them up in clear goodie bags and tie the top with ribbon.

Now its's time to dress up and have fun! This year I was Rapunzel, Justin was Flynn Rider, and Nala was the cutest cat horse.


Friday, October 25, 2013

Fall Flavors

10/25/13

Happy Friday! Since fall is upon us (even though it feels like winter already), I thought I would try out some recipes that involve the comforting and warm autumn flavors. We had a large bag of plain almonds that have barely been touched, but by adding some cinnamon, sugar and pumpkin spices, we could not keep our hands off of them. In addition, I had always been wanting to try out spaghetti squash. Since it is a great fall vegetable, I thought it would be a perfect time to give this recipe a whirl. If you love pasta, but are trying to watch the calories, I definitely recommend trying spaghetti squash. At about 40 calories/serving as opposed to 200 calories/serving and additional vitamins such as vitamin A, potassium, and beta-carotene, it's definitely a healthy alternative. Fall is one of my favorite times of the year because I love to cozy up and indulge in all the delicious flavors of the season!

Pumpkin Spice Almonds

Ingredients:
2 Cups Raw Almonds
4 Tsp Cinnamon
1/8 Cup Sugar
3 Tsp Pumpkin Pie Spice
4 Tbsp Honey
1 Tsp Vanilla Extract
1 Tsp Salt

Directions:
1. Preheat the oven to 325 degrees.
2. Combine almonds, cinnamon, sugar, pumpkin pie spice, honey, vanilla extract, and salt into a bowl until almonds are completely coated.
3. Spray a baking sheet with cooking spray and spread out almonds.
4. Cook 20 minutes, flipping the almonds midway through.
5. Sprinkle additional sugar over the almonds and snack away!


Parmesan-Garlic Spaghetti Squash

Ingredients:
1 Large Spaghetti Squash
2 Tsp Olive Oil
1 Tbsp Capers
2 Cloves Garlic, Minced
1/8 Cup Grated Parmesan Cheese
1 Tsp Dried Oregano
Sprinkle of Salt & Pepper

Directions:
1. Preheat the oven to 375 degrees.
2. Cut spaghetti squash in half lengthwise and using a spoon, remove the seeds as you would a pumpkin.
3. Place the squash haves in a roasting pan face down and fill water up to about 1/2 inch in the pan.
Cover the pan with foil and bake in the oven for 45 minutes.
4. Remove pan from oven and flip the squash halves over, facing upwards. Cover the pan with foil and bake for another 15 minutes.
5. Remove from pan from oven again and let the squash cool for a few minutes.
6. Using a fork, scrape the inside of the squash so that you create strands of spaghetti. Once the insides have been removed, use a strainer to remove as much excess water as you can.
7. Heat a saute pan with oil and add garlic. Add the squash, parmesan cheese, oregano, capers, salt, and pepper and allow everything to heat and incorporate flavors.
8. Consistently stir the squash for about 3-5 minutes and remove from pan.
9. Add squash to a bowl, sprinkle with parmesan cheese, and fill yourself up on this low calorie dish!
*If you prefer marinara sauce, you can use your favorite pasta sauce in a jar and use it with your squash instead. I gave both kinds a try and they both worked great!


Friday, October 18, 2013

Spice Up Your Pasta!

10/18/13

If you are tired of the same old pasta and marinara sauce from a jar, it's time to spice things up! Justin and I have been staring at the same box of farfalle pasta in the pantry for months and finally decided it was time to whip up a pasta dish. If your pasta dish seems like it will be bland, you should search around your kitchen for some ingredients that will liven it up with flavor! We rounded up some onions and leftover chicken sausage from the freezer and found some red pepper flakes along with dried oregano to intensify the sauce. Adding some extra ingredients to your pasta makes your night in at home feel like a night out in Rome =).

Spicy Chicken Sausage Pasta

Ingredients:
1 Box Farfalle
1 Jar Marinara Sauce
2 Chicken Sausage Links
1/4 Cup Chopped Onions
1 Clove Chopped Garlic
1 Tbsp Olive Oil
1/2 Tbsp Red Pepper Flakes
1 Tsp Dried Oregano
*add parmesan cheese if you wish!

Directions:
1. Cook pasta as directed on package.
2. Heat up saute pan with the olive oil and add the onions, sausage and garlic.
3. Pour sauce into the pan and sprinkle in the pepper flakes and oregano.
4. Lower heat and allow the flavors to cook and blend together.
5. Pour the sauce over pasta and sprinkle on some parmesan cheese.
6. It's that simple! Buon appetito!


It's Always a Fiesta at Que Rico!

10/15/13

Since I have been living in the city for just over a year now, I think my favorite restaurant in the area still has to be Que Rico. It is a quaint little mexican restaurant right around the corner from my apartment. Their food is outstanding and the ambience makes you want to hang out forever with friends, family, and never-ending margarita pitchers. Whenever I eat at mexican restaurants, it is very hard to resist filling up on chips and salsa. Trust me, this is a place where you need to try and save room for your meal as well! Their salsa is perfectly spicy, their chips are thick and authentic, and their margaritas are never syrupy and probably the best i've had! When I come here I usually order the Chicken and Shrimp Fajitas. I came here the other night and spent a wonderful time with my family. I highly suggest doing the same with yours! =)


Our waiter even threw in an extra pitcher for us...yikes! =)

I loved their Halloween decorations! The place was covered with spooky decor.

Fish Tacos, Lemon Chicken, and Fajitas- you can't go wrong here!


Tuesday, October 15, 2013

Easy Cheesy

10/15/13

During our trip to Madison to visit Molly and celebrate homecoming, we had the opportunity to try the famous cheesy bread from the local farmers market. It was so fresh and tasty that when Kim brought it back to us at the KK bar, we couldn't keep our hands off of it! (It didn't help that we had some drinks in us either ;)). Last night Justin and I were both suffering from cheesy bread withdrawal, so we decided to make our own! Warning: THIS IS ADDICTING!

Stuffed Italian Cheesy Bread


Ingredients:
1 Large Italian Loaf
1 Stick Butter, Melted
1/8 Cup Olive Oil
3 Tsp Minced Onion
1-2 Tbsp Minced Garlic
1 Tbsp Dijon Mustard
12 Oz Grated Cheese (Your Favorite)

Directions:
1. Preheat the oven to 350 F.
2. Mix the melted butter, olive oil, onion, garlic, and mustard in a bowl.
3. Cut the bread diagonally in order to form small cubes without cutting all the way through.
4. Fill the cracks with the butter mixture and follow by stuffing the cheese on top.
5. Wrap the entire loaf with foil and bake for 15-20 minutes. Remove the loaf from the oven and unwrap. Bake for another 10 minutes until the cheese is all melted and the top of the bread is slightly crispy.
6. Enjoy this snack or appetizer while it is nice and hot!


Monday, October 7, 2013

It Takes Two To Tango

10/7/13

If you are ever looking for a romantic date night spot in the Lakeview area, there is no better place than Tango Sur. I have been here many times and it never disappoints. The entire restaurant is dark and lit with only candlelight. Their Brazilian food is hearty, delicious, and filling that includes steaks, chicken, empanadas, and pasta. I just love the romantic and cozy atmosphere! The best part of this restaurant other than the food is that it is BYOB! Be sure to bring your favorite wine and enjoy a relaxing night with your significant other... or in our case great friends! =)


The only downfall is their salad...you may mistake it for burger toppings

This is a split portion of the El Filet. They give you two filet mignons with a side of spinach mashed potatoes...YUM.